Fragile Old Bench with SK

Deb's Fragile Old Bench

I've come to expect the best from the Graphics Fairy. I'm always delkighted to find exactly what I need when undergoing a project.
http://thegraphicsfairy.com/french-brewery-transfer/
Thank you to The Graphics Fairy for the nice review. 
Using The Graphics Fairy graphic, the words were changed to my clients estate name.
The bench had been out in the elements, freeze and heat of Eastern Washington State for decades. She challenged me! How amazing, people actually believe I can fix cool stuff.

He literally had to be restored, screwed, filled and sanded several times. Although he is still fragile, wood glue and screws have made him a bit more sturdy.

After sanding one last time, I mixed a soft cream from my custom chalk paints and painted the entire surface. It was sanded and painted an additional two times, sanding in between coats.
The decorative elements had been made from cheap plywood which had split and warped. Trying to figure out what I could use in their place was a challenge.

The support brackets are only 1/2". Should I cut a new element or choose something a bit more fun.

I chose a powdered coated metal iron baluster from Lowes, which I cut down to the correct size needed for the spaces.
  I have linked the picture to my supplier.

I hand carved slots into the back of the bench to fit the cut baluster pieces. They were epoxied into place with a small molding to finish.
 
My first inspiration didn't look as I envisioned.
The graphic was too large, overwhelming the bench.
 
The inside of the lidded storage area is lined with a pretty damask paper, although the bench will spend the rest of it's life in a protected area. I sealed this interior with a weather proof sealer, 
I am lucky to have had a small part of this homes design. This client has excellent taste and wished for her old farmhouse to be brought into it's next fifty years. Almost a 1000+ sq. ft. was added to the original home.

I was thrilled to draw these building plans.

A new entry, stairs and kitchen was essentially the entire remodel.
Beautiful furniture to follow. A massive black, eight foot tall armoire  will find a new home on the wall to the left.


Deb travels extensively. She always brings back unique treasures.
Again, I am fortunate to have been a part of this beautiful home.


It was recommended to glue these pieces on with rubber cement. I didn't have great luck with that. I used a two part mixed epoxy.
The front bottom panel was also covered with the damask paper. 
                       
After sanding once again, I repainted the entire piece. The next step is to wash with a warm chocolate glaze and wipe off. You can wash as much off as you like. 
I like the old look.


I silver foiled the damask raised design. Then sanded it back. Just a touch of shiny...

Thanks for visiting.

Wild Wood Roses with SK

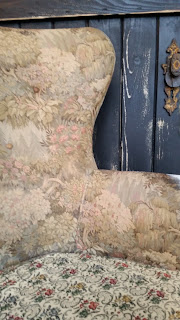
A very large gull wing back chair has been in storage for decades. 

#Painted upholstery# painted fabric

What Are Dreams Made OF

 My owner had no idea what to do with it other than have it re-upholstered. So he just sits. Lonely and scared of ending up back at a discount store.

 Most of the fabric was in relatively good condition. There were several worn spots and the piping was worn and ragged.
The upholstery  route was the easiest, yet she hesitated. It seemed her sad chair was destined for something a bit more.

The owner approached me with the hopes and curiosity of the upholstery perhaps being dyed or painted.

Hmmm....Let's see. Yup, I'm gonna paint this puppy. I had never painted such old and worn fabrics before, so this was going to be a treasure hunt. If I don't mess it up. Her attitude was " If we don't like it, no harm no foul:. We can just have it upholstered in the traditional way."

Alright then. Here I go....Not knowing what I was getting myself into.
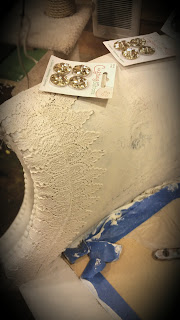
Using a beautiful lace I covered and hand sewed the lace to the time-worn roll arms.
I lightly cleaned the fabric. Then very lightly sanded using a 400 grit sandpaper. This helped raise the fibers.
Using my personal custom chalked paints, I began by painting a very light coat on damp fabric.

I painted five coats in the same manner. Always dampening the fabric first.
When all the fabric was cream with no fabric showing, I let her dry.

The cream stripes were painted in a gloss, so to just have a slight presence.

The pictures above were my first attempt. I walked away for some weeks. This chair seemed to growl and mumble, every time I walked into the studio. I would growl back and walk away...
The Graphics Fairy is the  best place for graphics I use. They are amazing. I can always be certain Karen will have what I am dreaming of. And I appreciate her efforts to continually update her archives.
 
Thanks Karen and The Graphics Fairy. Again! You are my hero!

The seat was unusable from a hundred years of wear. I recovered it with white canvas and then added a beautiful heavy lace. This was then painted to match the background of the chairs body.


Because the right side of the back sections would be seen on entry, my design needed to reflect this.
My client is such a beautiful classy lady and she has a beautiful home, which I have had joy in completing many years of work in design details.

The lace in the upper right is very heavy and sewn on by hand, then painted.

I added the lace to make sense of the chair seat design.
 I also added a bit of lace on the front left corner for balance.

As I finished this piece, I waxed the surface with a clear paste wax. Then buffed for an old shine. I did this three times. This will help protect the painting and keep it from absorbing stains.
The fabric finish feels like soft leather.

I have created other artworks and custom rugs for this exceptional client. Pictures of those works have long been misplaced. I will have time, I hope in our next snow day, to find all these works.
 Thanks for visiting. SK