Showing posts with label holiday decorations. sk sartell. Show all posts

Poppin' Up Possies with SK


As each flower and leaf was placed, the design began to take shape.

 A Sisters Dream Room


Two sisters joyfully share a little dream, which they know Nana can create for them.
It all starts with the sweet colors of teal, pinks and corals.
The tree trunk and branches are painted directly onto the wall and ceiling. Decorative paper is used to make 3-D leaves and flowers. I pinched the leaf bottoms together to give them a more dimentional apperanace. Then using thumb tacks, just simply tack them in place.

 The oldest of the sisters wanted to be a part of her rooms creation. She had such fun working with her Nana.
The bright green cabinet was created using an old, worn, black armoire. Her insides are painted teal.
Thanks for visiting.


Wild Horses with SK

A thirty year old spring horse was my latest challenge. My client didn't want him to look original. She gave me free reign (get it?) to create a one-of-a-kind piece.


After this pretty pony was sanded and bonding primed, it was time to add a few details in sculpturing.


 With the help of Modern Masters Metal Effects Paint I was able to rust his mane, tail and hooves. His saddle is patine d copper. The blanket is a deep warm Burgundy red.

The body is painted a deep chocolate and then glazed with a crackle medium. After these coats are dry, I painted him in an antique cream and after the crackle has cured, I glazed him with a deep chocolate glaze and varnish.


Thanks for visiting. sk


Painted Canvas Pillow Talk with SK

Painted Canvas and Burlap Pillows for A Special Client.

Jet black beading, fun buttons, painted ribbon and burlap flowers.
#PaintedUpholstery

Thanks for visiting. sk
#paintedupholstery
#paintedfabric                           

Scrappy Pumpkins with SK

With a few canvas scraps left over from other projects, I was inspired by a cute no-sew pumpkin tutorial. Quick and easy for those of us who are challenged with more difficult projects.

Thanks to  Kristy at Three Peppers: http://3peppers-recipes.com/diy-painted-canvas-pumpkins/
for the detailed instructions.

I used burlap ribbon for my stems and curlycews. And green painted burlap for leaves. I loved the simplicity of the pumpkins without faces. I might paint a few scraps of burlap black and pin on faces for Halloween. Then for fall and Thanksgiving just keep them simple.

Thanks for visiting. sk on elderberry

Smiles and Groans


There are certain days it should be a law that you just stay in bed.  I have these just once in a blue moon, but this was certainly one of the days I should have taken precautions and at least stayed away from the old glue gun.

This old lamp shade has a great shape, but an old and stained silk fabric.
I thought I would try something new and clever. Oh Dear. Little did I know how difficult it is to create a nice lampshade. Maybe I should have done some studying up on the craft first. Naw. Not me.

I love the pattern and colors of  paper. Hey, thats a great idea cover a concave surface with something that cannot go with the flow. 

Looked horrible. But wait, maybe if I add some embellishments to the bottom and top it will look great. NOT!

I lived with it for maybe a half of a day. Nasty. I couldn't convince myself it was cool. My lifes work and creative skill is in jeopardy right now.

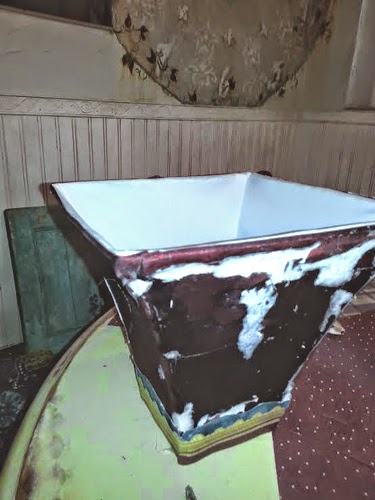
I made the monumental decision to start over. It took more time to strip the frame than to cover it in the first place, due to my exuberant glue gun techniques.

A razor knife and a few blue words latter I got it stripped. Paper, silk and glue flying.


 I had to use a razor knife t clean the frame Ok. Really it's that important to me to get this right? My pride and honor are at stake.  Found some quilt fabric left over from a more extensive project so here goes.

I don't like cutting fabric. I can never get it just right. So I tore these pieces in 2.5" wide lengths.


I had planned on gluing the fabric on the frame. Then I had the recollection of the last glue disaster. So thought tying might be a better option. Then if I hate it, I can remove these strips of fabric with ease.

                             
I pulled the strips up from the bottom of the frame and proceeded to just tie them in a little knot on top.
The more I added the more fun it became.

  
I started adding beads and turquoise rocks to the ends of little ribbons. This gives it a little sparkle.
Not an amazing project, but something I needed to do to fix the horrific aftermath of the first try. This might not last long, but for right now it makes me smile. Now I can call my life complete....

Thanks for visiting.
sk

Copper Counters & SK

I love copper, in all it's forms. I started working with 16 ml sheet copper for my countertops. It. was an enlightening project.
To say the least, I learned a lot.
This might not be a project most people would attack. But when I want something, I jump in, and as well as getting something cool, I learn a little along the way.

Stuffed & Painted

With left-over canvas fabric I learned how to sew simple pillow covers. Simple enough project.

Each pillow is painted on each side. The one side is for spring/summer/country, the other sides are painted for winter/valentines.

PoppyCock
Brrr...


 My grandbabies love flipping every pillow over, hoping for another new surprise.

You can now order your own hand painted pillows or Lady Bug Book from SK's Etsy Shop at: https://www.etsy.com/people/sartellart?ref=si_pr

Thanks for visiting. sk on elderberry