Showing posts with label SK Sartell Pinterest. Show all posts

Mr. Bassel on Easter with SK

We All Have that one Friend...

Holly at Borei Designs causes trouble...I see what she is playing with and I immediately want to play too.

UPDATE: Borei Design has elevated Mr. Bassell into her realm of fun and friviolics. My own special word for my own special friend. Thank you Holly at Borei Design

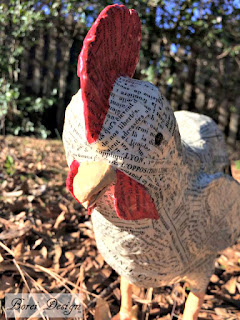
I saw her paper mache French chicken and voila. There I go again starting another project, before I finish the five semi-finished, And overdue projects sitting in the studio. Ah well.

Thanks Holly. This was such fun.  You can see her complete tutorial at the following address.
 Borei Design
With Easter just around the corner and me bored with my latest five projects, I decided to create a French Rabbit and name him Mr. Bassell.

As Mistress Borei says: (mine went a bit differently just because of size) (Mr. Bassell is just under 2 2/1 ' tall. So he needed a wire body for the sheer weight of his size.)

1. I sketched out a very basic shape of a chicken's body on the back of a piece of scrap wrapping paper and cut it out. I then traced it on the side of an old cardboard box and cut it out.

(SK) I sketched my idea out but he just seemed to get bigger and bigger.
I began to wrap wire around a 1" wooden dowel. I screwed 1/4"x1" wood feet to the bottom of the dowel so he would stand sturdy.
                                   
As I wrapped the wire, I began to form his head, body and back legs. Pushing and prodding until I achieved the shape I was looking for. 

When the wire frame was complete I started to stuff him with paper.
Kinda creepy if you ask me...
With Bassell stuffed and standing. I wrapped him in masking tape. Holly used white. Smart girl which she is. I had blue, so that's what I used. Not realizing the blue color would show through his thin paper skin. Duh!

Holy also used a clay to cover him. Another smart idea.
11.  For extra durability, I then covered the entire project in Activa Celluclay and  allowed it to air dry.  I sat him in the window and he dried in completely in about two days.

I skipped this step. I shouldn't have. Holly's a smart cookie. It would have made Mr. Bassel too heavy for the size he was.(or so I thought)
I used Holly's paper mache recipe to begin his "skin".  It's fun and messy to work with. I made sure to cover my work space, because I know I'm a much more messy person than Holly.

Here's Holly's magic
4. I whipped up a batch of paper mache paste and ripped up some newspaper in strips.  I then added a couple of layers of paper mache (paste-dipped) strips all over the body.  I dried it in the oven at 200 degrees Fahrenheit in between layers.  Drying in the oven helps speed up the drying time of paper mache paste.  Just make sure you don't "overcook" your project and check it every 15-20 minutes.  You can also use a hair dryer to help speed drying time.  Just make sure your project is completely dry before each new step.               
Holly's Papier-Mâché Paste Recipe
Ingredients
5 Parts Water
1 Part Flour
1-2 Tbs of Salt

Directions

Put 4 parts water into a pot on the stove and bring it to a boil. While you are waiting for it to boil, mix 1 part flour to 1 part warm water. Beat this mixture briskly to remove lumps. Once your pot of water is boiling, slowly stir in salt (helps to combat mold & mildew) along with water and flour mixture. Mix well and let it boil for 2 - 3 minutes, stirring constantly.  Mix to a gooey glue-like consistency.  Add more flour and/or water as needed to achieve desired consistency.  If you make more than you will use in one day, be sure to store excess in the fridge overnight.  When ready for reuse, heat and add additional water to thin and smooth if necessary.  

This was fun stuff. Hot as hades at first. Just keep working with it. I used an entire batch for Mr. Bassell.
My paper is tissue paper from Hobby Lobby, which I cut into 2-3" strips.

I then created funky arms and his little nose with twisted wet Papier-Mâché  (ooo la la. Must be French) and using wire attached his arms into place. I moved them a couple of times. I couldn't get them in a position that didn't look weird. I just kept positioning till they looked a bit more natural. I just used more paper to cover the wired points.
With a lighter polka dot tissue I added a vest and the inside of his ears. With a long piece of folded paper I created his stand-up collar. When the paper was dry, I cut his vests front points. The back of his vest is pleated.
Using wire to make his whiskers. I curled one end of the wire, then poked a hole through his nose and threaded the wires into place. Then cut them and curled the other side. A pretty teal striped cardstock made his bowtie. A little teal and diamond button holds his vest in it's proper place.

After he was completely dry, I sprayed him with a satin lacquer finish.
 
A little painted heart finished his attire for Easter Sunday.
He needs a SMILE! Ok, Ok.

Thank you Holly for your inspiration and techniques. I'm onto the next one. He's three feet tall....Next time.
Holly of Borei Design is a Hometalk professional. Here is her Blog Address.

Thanks for visiting. And thanks again for Holly's inspirations. I can always count on her.


Old Gym Lockers with SK

Heavy Metal Gym Lockers with New Finishes

Friends and cohorts are great to have on your side. I have several whom save special finds for me.

I had designed my studio around three very special pieces of furniture. The old lockers being number one on my list.

These old gym lockers had stood outside in the weather for ten years by the time I got my hands on them. They had dents and rust galore.
 
I painted the interior with a spray primer which had been tinted aqua.
I then painted the interior of the doors with Modern Master Metal Effects Paints, copper and iron.
This color was chosen to match my studio floors.
Although the picture below seems to be a different color than the floors, they are actually the same exact paint and colors.

The exterior is painted with my copper and rust oxizing paints from Modern Masters.
Using  Hard Rock Putty paste and a vine stencil, I added a three-D design and painted it with the iron/rust oxizing paint.

 I screwed through the metal backs of the locker to my shiplap wall for security. When they are filled with tools and paints it is very heavy.
The shelving is old wood. Adding and glueing pretty old black paper finishes the inside backs.

The finished lockers are placed on a shelf which hold all my stencils. We then crown molded the top and I painted it rust.
As my studio is finished one step at a time, the finished lockers are all I envisioned, as I dreamed of my amazing personal space.

Thanks for visiting. SK


French Blues with SK

The French Blues

This "little" project was a joy to create. The old, rickety chairs, little desk and bedside table had seen better days.

SK and The Hope Chest

My Mother's Hope, 1940 World War II and a Handsome Sailor

This beautiful aromatic cedar hope chest was given to my mother in 1945 a year or so after she was married. Dad was a machinist mate on the World War II destroyer tender Piedmont. This didn't mean much to me until I had become an adult and learned the history and ramifications of this horrible war.

My mom passed away last year at the young age of ninety three, I was given her hope chest.

And the chest I received certainly did not look like this... 

With delight I started to rummage through mom and dad's past. Not until I found the bundle of tied love letters, did I slow down and show the reverence this prize contained.
As a child this chest was always in my parent's bedroom. I was not allowed to open this treasure without mom's attendance. I remember vividly the fragrant cedar smell as this "secret" chest was opened.

Although the inside was beautifully intact, the exterior had been painted and was now an old cracked and peeling white.  I could see damaged and peeling vanner had been sanded and puttied. 


But I had no idea where or if I wanted to have this in my own home. Other than a sentimental value, it was in very poor shape.
When a small child's mom had painted her hope chest an antique cream. I didn't know why or even cared at the time.

With a certainty, the paint could and was a lead-based paint. I wanted to be careful with how to proceed. 

With my face mask on, I began to lightly sand the top, where I could see the most damage. As I lightly sanded the front of the chest I began to see a sunburst pattern of light ridges appear. I hated to ruin the chest with indiscriminate sanding, so I slowly did bits at a time. As the sunburst pattern became more and more apparent, I knew there was a beautiful secret behind all the old white paint.
With a bit of research, I found that The Roos Corporation of Forest Park, Illinois was a manufacturer of these fine cedar chests.

With aromatic cedar as the interior and the front an inlaid book-matched rosewood and other precious woods, my mothers chest is truly my new treasure. With a last 400 grit sanding, I used a boiled linseed oil to bring out the distinct patterns and colors. As I run my hand over the surface it feels like fine silk.

With the sweet memories of my mom and dad and their sixty-plus years of marriage my sentimentality came to the forefront, and I did not completely refurbish my treasure.  I chose to keep a bit of my mom's paint and still enjoy the beautiful woodwork.

                                     
I love this piece of my parents history and will enjoy having it in my bedroom for the next fifty years or so. Then my daughters can fight over it...
Thanks for visiting. sk on elderberry

Round Top Love with SK

A Sorry Little Boy Continues:


A shattered and abused cabinet came my way this week. I call him a he, because he looks very masculine. Well maybe not, I will come up with a better name soon. I love to name these old pieces. I think they deserve the attention.

A Life Long Wedding Round One. Kimmie's Paper Flowers

Kimmie


It's not often an artist has the privilege of planning an event such as this. And I'm not totally sure how to document the three months of work and planning.

Kimmie asked me at the age of ten, if I would "do" her wedding when she grew up. Of course I said yes. That was twenty some odd years ago. I had no idea of what I was in for.

The Painted Drawer Inspiration Friday Link Party & SK

Yippee Skippy. Great smiles for Friday.

Texas' blue denim room is featured on the Painted Drawer Inspiration Friday Link Party

Rout 66 and red, white and blues. Denim painted walls and tin toys. How fun is this?

Thanks Painted Drawer.

Pure White and Burlap RS Birthday with SK

Follow my blog with Bloglovin
Weeks of creative work went into hand-making these lovely burlap and lace flower arrangements.
Ball jars, of course, were dipped in gold glitter and wrapped in white lace. Over a hundred flowers of varying sizes, shapes and embellishments were  a few weeks challenge.

Chef Darcy of Silver Spoon Cakes from Salt Lake City was the event coordinator and artist.

Oregon Through Utah to Texas Keith

Texas Keith Red, White and Blues

Decorating on the fly and on the cheap with Chef Darcy of Silver Spoon Cakes in Salt Lake City.

SK's Sweet Lizzie Rose

A pretty little project for a pretty little girl. 


SK's Vain Pink Lady

So Sad. So Glad

This poor little lady had seen better days, heck she had seen better centuries. I was really hopeful we could save her.

SK's Painted Journey of Wishes


"To Roam or not to Rome"


My Father was on a sailor on a destroyer tender ship in the Japan Harbor when the armistice of World War II was signed. This iconic image of a sailor kissing a surprised nurse whispers memories of a generation almost gone.

My Mother also now gone, keeped this gem of a newspaper article her entire life. I found it in her hope chest after she passed away this last year. 

I dedicate this awesome chair to my Mom and Dad. A generation of strong, honest, courageous and hard working people. Thank you for your example.


This would have been called a English gentleman's smoking chair. Sadly left alone on a thrift floor for many months, I purchased him for a grand price of $19.00. Actually my friend/buyer found him. She has the best eye for the best prices. It's not like she has time to do this for me. Heidi is the owner/operator of Pine Lodge Labradoodles which has an international reputation. Thanks Heidi.
 http://pinelodgelabradoodles.com/

I cleaned the chair thoroughly with a mixture of Dawn and vinegar. I then sanded the surface with a 220 grit sponge sanding block. The point is to remove any sealants and oils. Fingerprint oils are almost impossible to paint over.

                                           
Although the chair was built with the greatest of care, including down filling, the upholstery fabric is an inexpensive vinyl. After ninety five years or so, the surface was showing great areas of stress and rubbing. The cording was in excellent condition, just decades of rub marks

I was very interested in how and what could be used to paint old vinyl. As I tested different brands of paint, I tested a spray paint made for plastics. I must have done something terrible. It stayed sticky for days. I eventually took a paint remover and removed all the paint I had done. Interestingly enough the more I cleaned with this paint remover the better the vinyl looked. It also made the surface an excellent surface for chalk paint. 

Chalk paint does not rub off on clothes and it does not crack. I was careful to sand in between coats of paint. My next project with vinyl will go much faster as I seem to have the need to reinvent the wheel.

I made a custom cream chalk paint for the body. I painted two coats with sanding between dry coats.
My chalk recipe is: 1 part calcium carbonate (powdered chalk) 2 parts flat latex paint.

1 Part Chalk
2 Parts Flat Latex Paint
Mix till no lumps and keep stirring occasionally while painting.
2 TBSP water.
 "To Roam or not to Rome"
 The design I imagined so carefully in my dreams, evolved as I painted. I wanted to see if I could create a piece with balance of color and design and still keep the theme intact.
My theme morphed into a masculine dream of travel.
The steps in painting the newspaper and picture was long and trying.
 "Always Kiss Me Goodnight"
"I Love You to the Moon and Back."
"To Roam or not to Rome"
Flower Puffs, my children call Wishes. I remember running down the road as a child with little specks of white magical puff flowing in my wake.
                       
"All those who wander are not lost" Bilbo Baggins 
At the completion of my painting I washed the entire surface with an antiquing medium of chocolate brown and carefully wiped most of it off.

The last step was to wax the entire piece with paste wax and buff to an old world shine. The nail heads are painted gold to match the dipped gold feet and gold offset buttons.


Thanks for visiting. sk on elderberry